In this article, we present the essential tools and best practices to ensure optimal performance and safety when using our wide selection of rigging devices: the Transport Anchor, the Mini Yoke, the Yoke 1T, the Yoke 5T, and the Yoke XL. Learn the do’s and don’ts to maximize efficiency and safety in your rigging operations. For more detailed guidance on choosing the right rigging device for your specific needs, refer to our previous article, “MTC Solutions Rigging Devices—How to Pick the Right Ones?”
Approximately 5-minute reading time.
Essential Rigging Tools
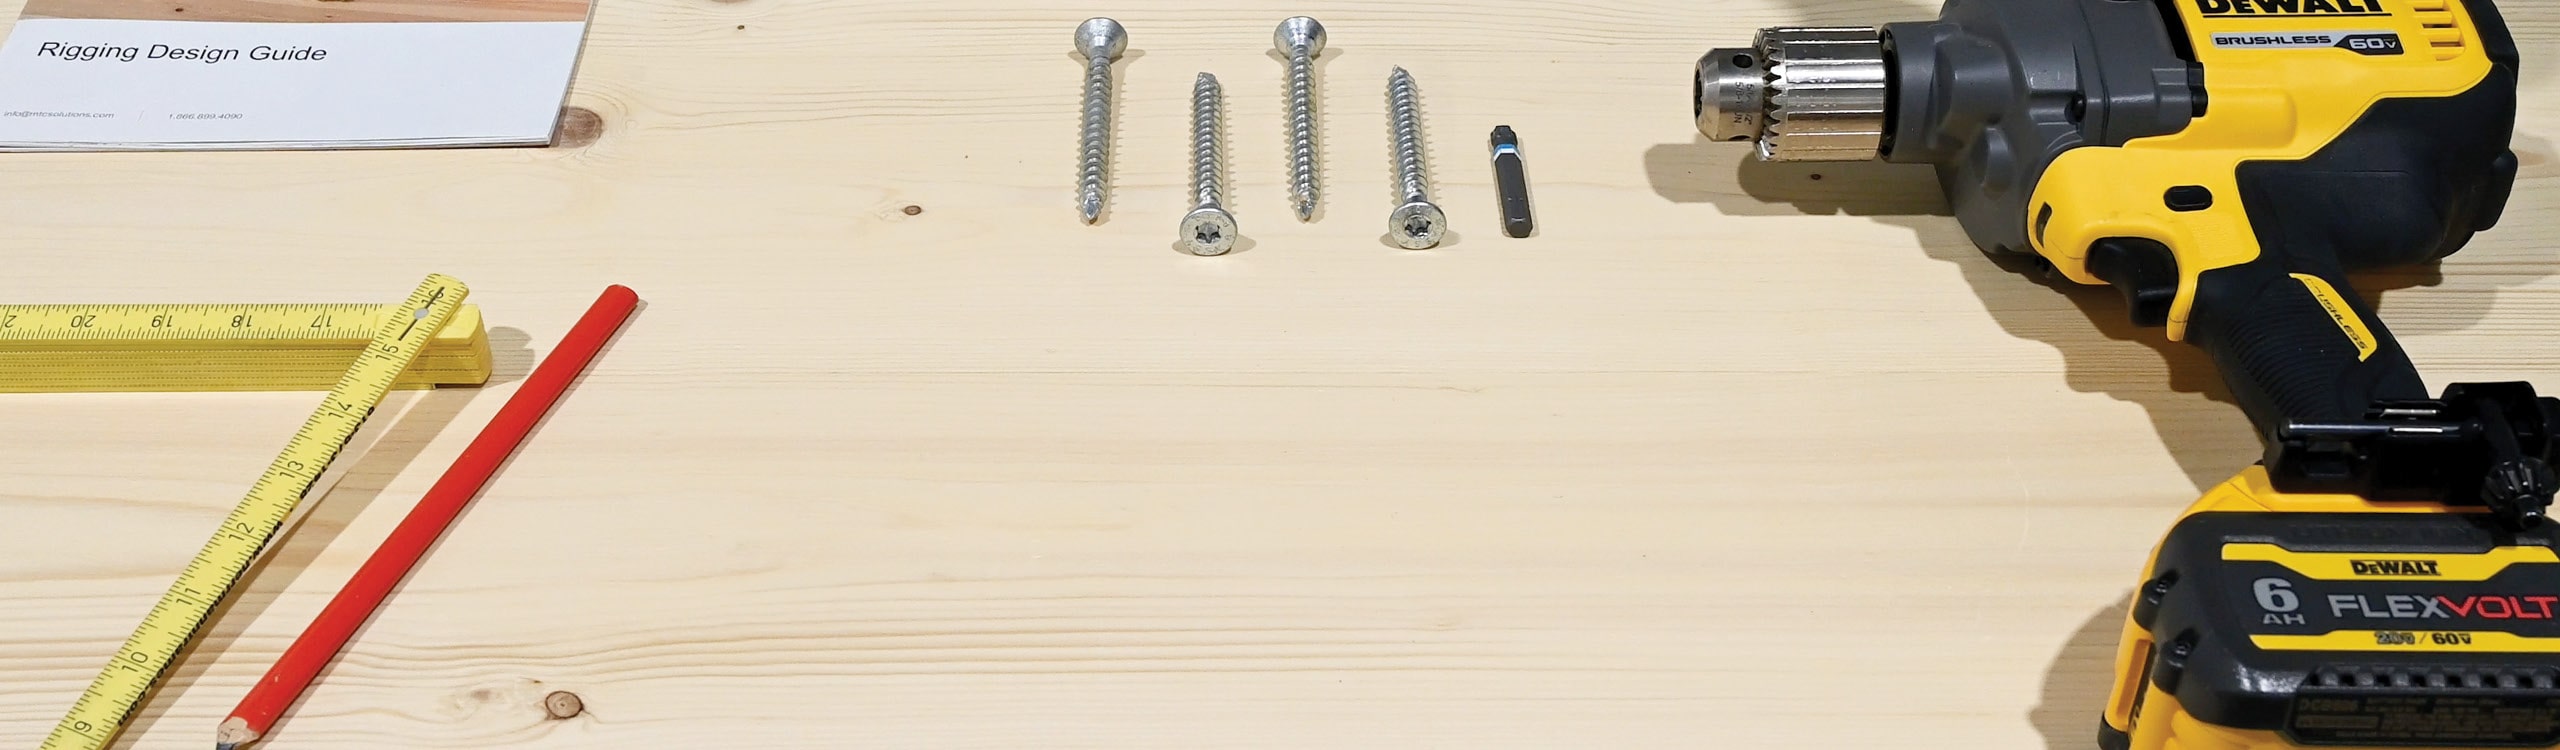
To ensure safety and performance, our anchors must be installed with ASSY self-tapping screws and driver bits, in accordance with our design guides (Rigging Design Guide and Structural Screw Catalog) developed by our team of engineers. Our rigging hardware should only be installed and used following our recommended installation methods to avoid damage and/or injury. The following video highlights all recommended tools useful for the rigging mass timber elements:
Selecting the right drill depends on multiple factors, including the diameter and length of the fastener, the quantity being installed, and the materials involved—such as the specific gravity of the timber or the presence of steel or aluminum components.
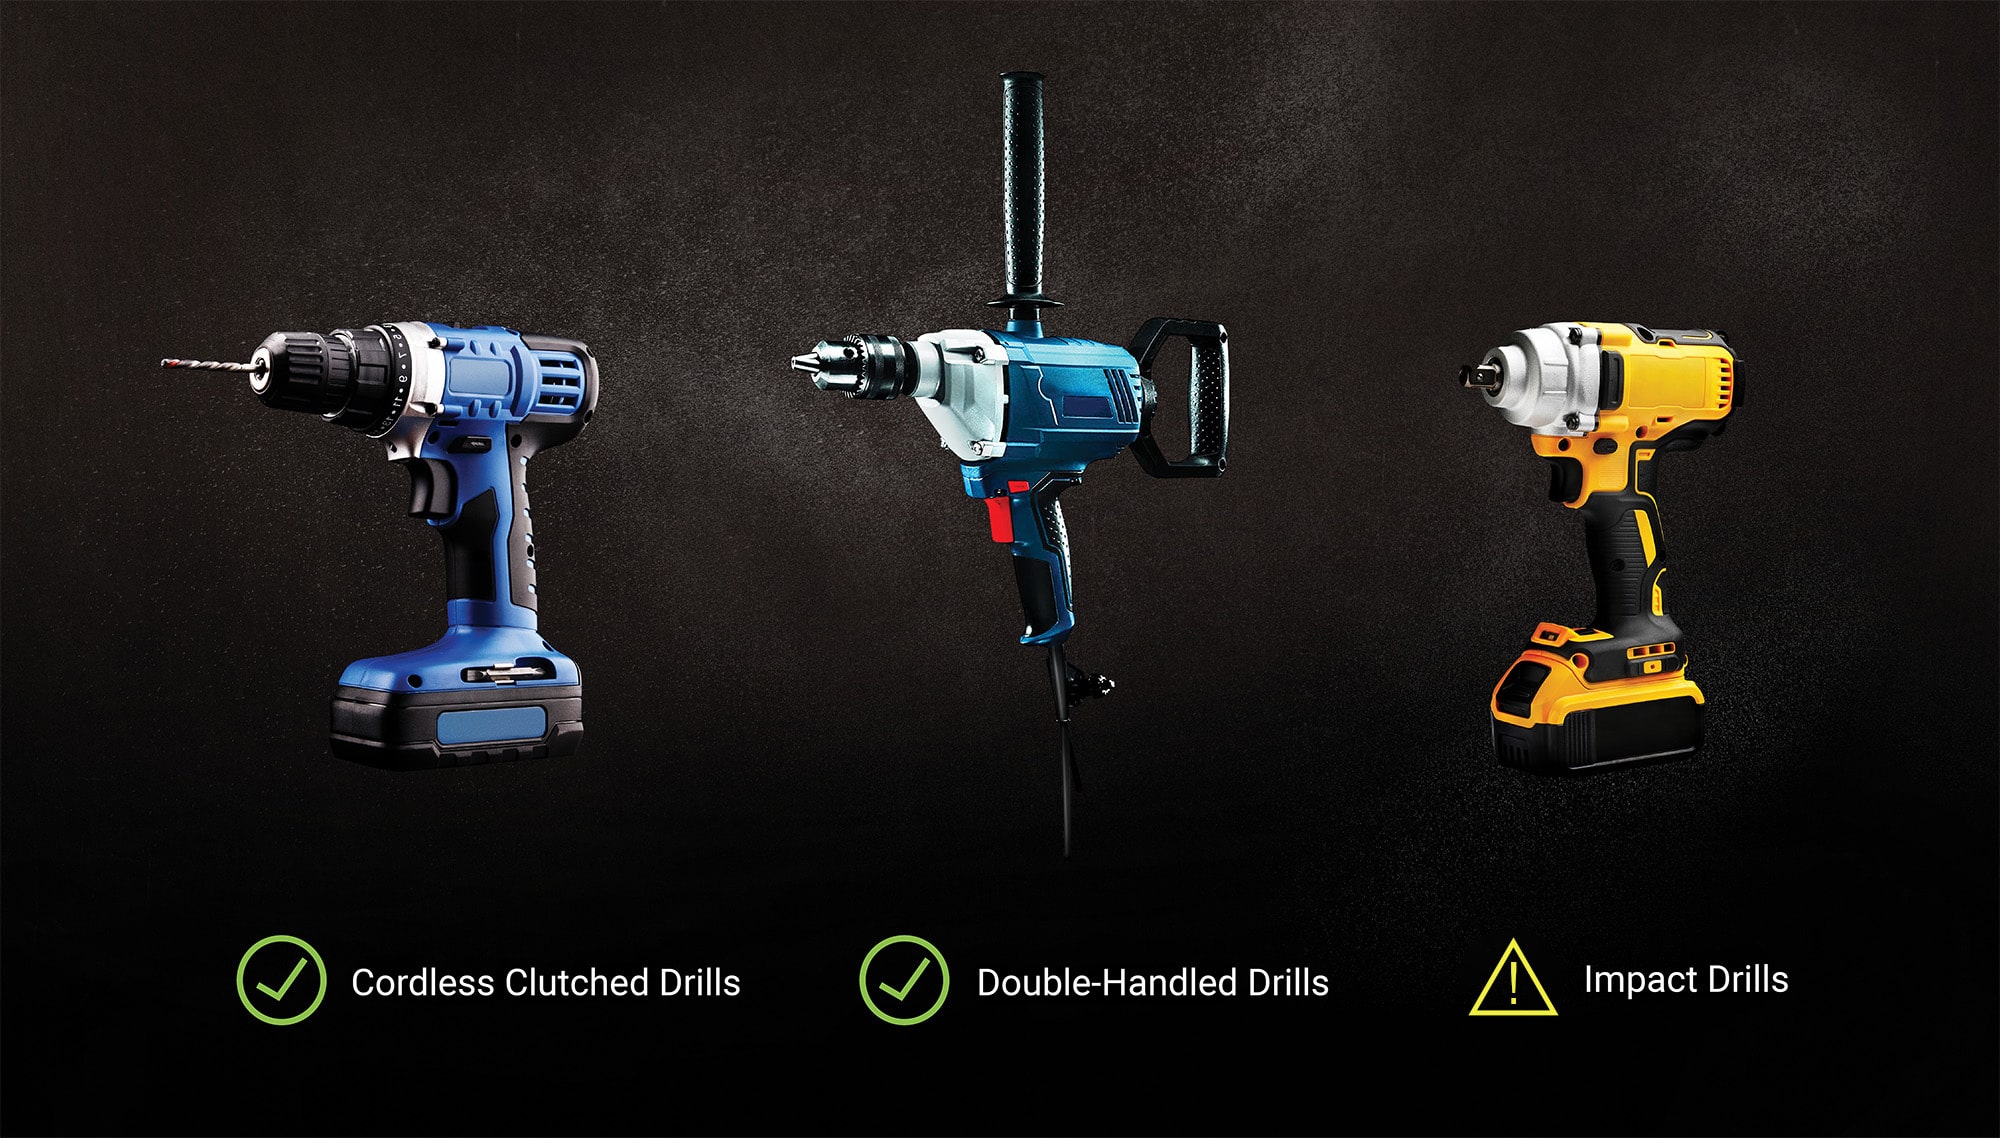
Figure 1. Power tools
For 1/4 in.[ 6 mm ] and 5/16 in.[ 8 mm ] diameter fasteners, a 20V battery-powered drill typically provides sufficient torque for proper installation.
For larger diameters—3/8 in.[ 10 mm ], 1/2 in.[ 12 mm ], and 9/16 in.[ 14 mm ]—a higher-powered 60V corded drill is generally recommended to achieve a smooth, continuous installation.
When installing 1/2 in.[ 12 mm ] and 9/16 in.[ 14 mm ] fasteners in particular, a double-handle drill is advised to better manage the higher torque demands.
The use of impact drills is not recommended for installing self-tapping screws—especially in beam hanger applications—due to the risk of overtorquing and the cyclic fatigue loading caused by their stop-and-go impact action. This can compromise fastener integrity, particularly in long or large-diameter screws. For more information on this recommendation, see our blog post, “Why Impact Drills Might Not Be the Best Tools for Mass Timber Hardware Installation?”
Installation Best Practices Before Installation
Engage a licensed rigging professional to calculate the proper positions for anchors:
verify the sling angle;
ensure even load distribution;
verify edge and end distance requirements; and
verify the orientation of the rigging devices.
Use the right rigging device for each lift.
Check the rigging device condition for excessive wear and tear or damage. See the Rigging Design Guide for detailed information.
Choose the right tool—Impact drills are NOT recommended:
the increased rotational impact force can easily lead to exceedance of the allowable torque;
they can cause cyclic fatigue loading, resulting in potential strength reduction; and
the lack of feedback can result in over torquing at seating, which can result in a hole that is over-augured and a significant reduction in capacity.
Install screws straight and use pilot or predrilled holes as recommended for specific wood species.
During Installation
For systems with multiple fasteners (Yoke Series), start the fastener installation process from the innermost screws and continue to the outermost screws.
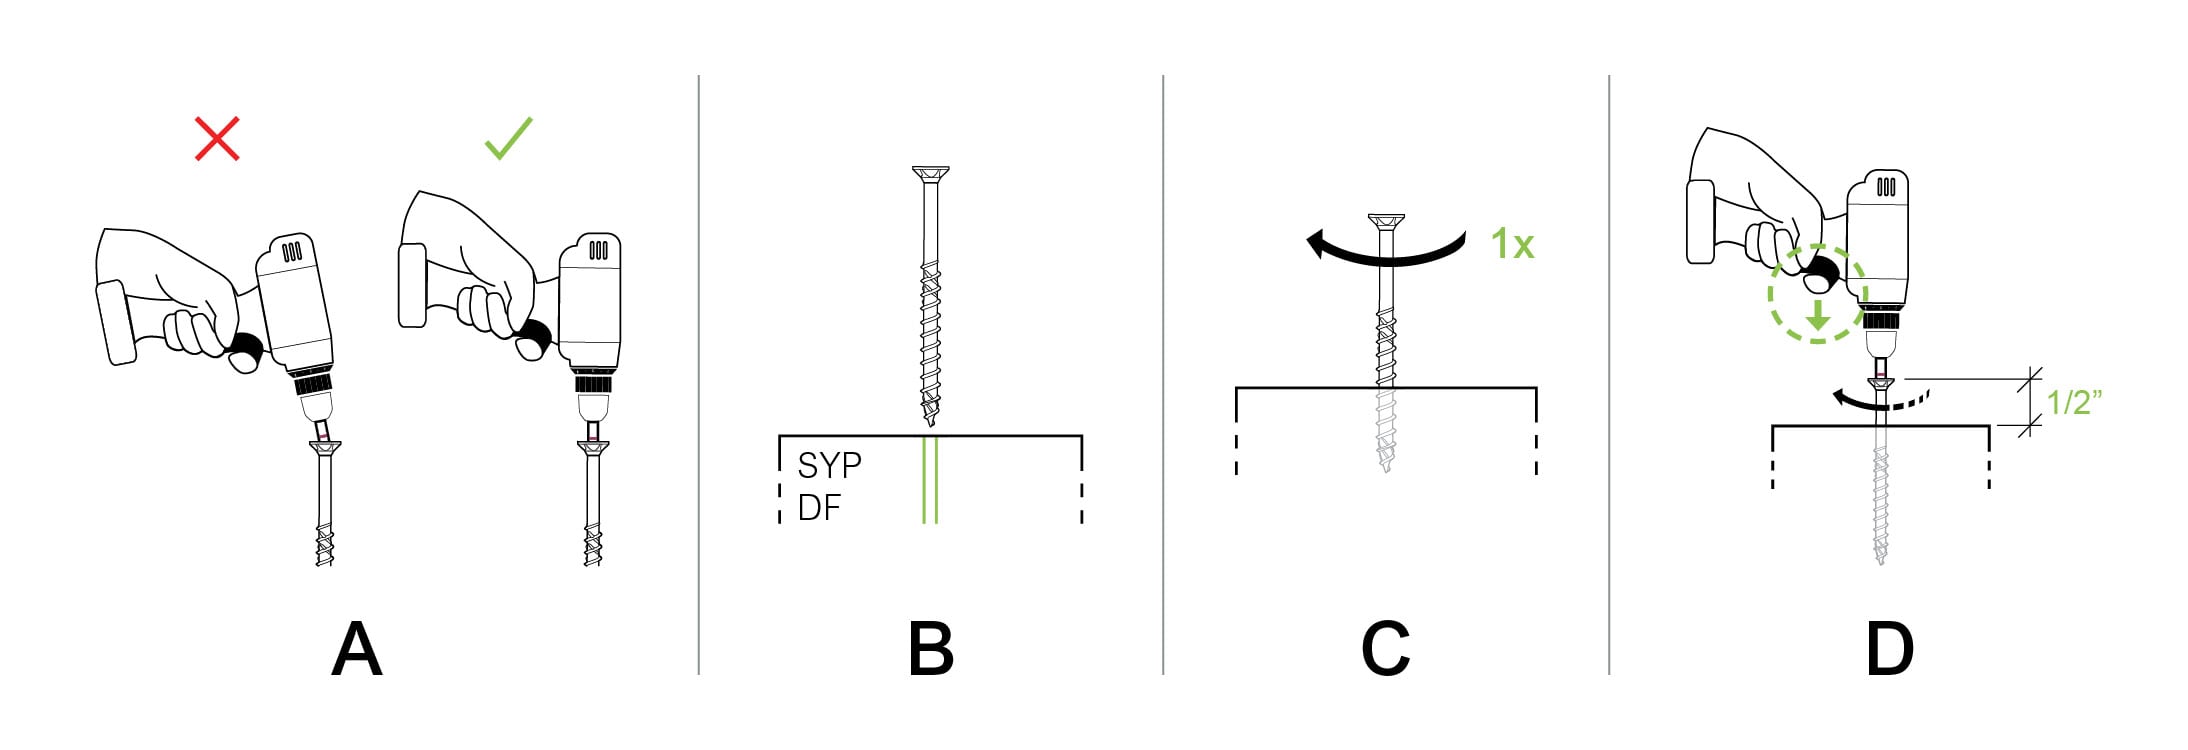
Align the RW driver bit parallel to the screw axis to prevent stripping and ensure proper torque transmission (Figure 2A).
Install screws straight and use pilot or predrilled holes as recommended for specific wood species (Figure 2B). See the Structural Screw Catalog for detailed recommendation on when pilot holes or predrilling are recommended.
Install each screw without interruption, as stopping and restarting the drive-in process can cause increased torque peaks (Figure 2C).
Reduce the rotational speed of the drill when the screw head is approximately 1/2 in.[ 12 mm ] away from its final position to avoid overtorquing during seating (Figure 2D).
Figure 2. Installation do’s
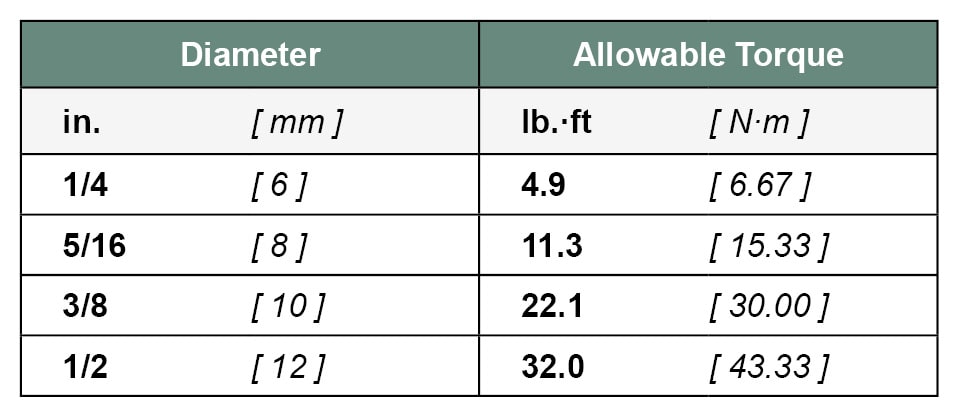
Do NOT exceed the allowable torque of the screws, which varies with the nominal diameter:
Table 1. Allowable torque based on fastener diameter
This can cause their head to break off, especially during seating, or compromise their capacity; and can lead to costly consequences, such as increased crane time, wasted panels, and workflow interruptions.
Do not apply excessive pressure on the drill once the fastener is engaged to avoid buckling the fastener.
Contact a licensed design professional if wood splitting is observed during installation.
💡 Pro Tips
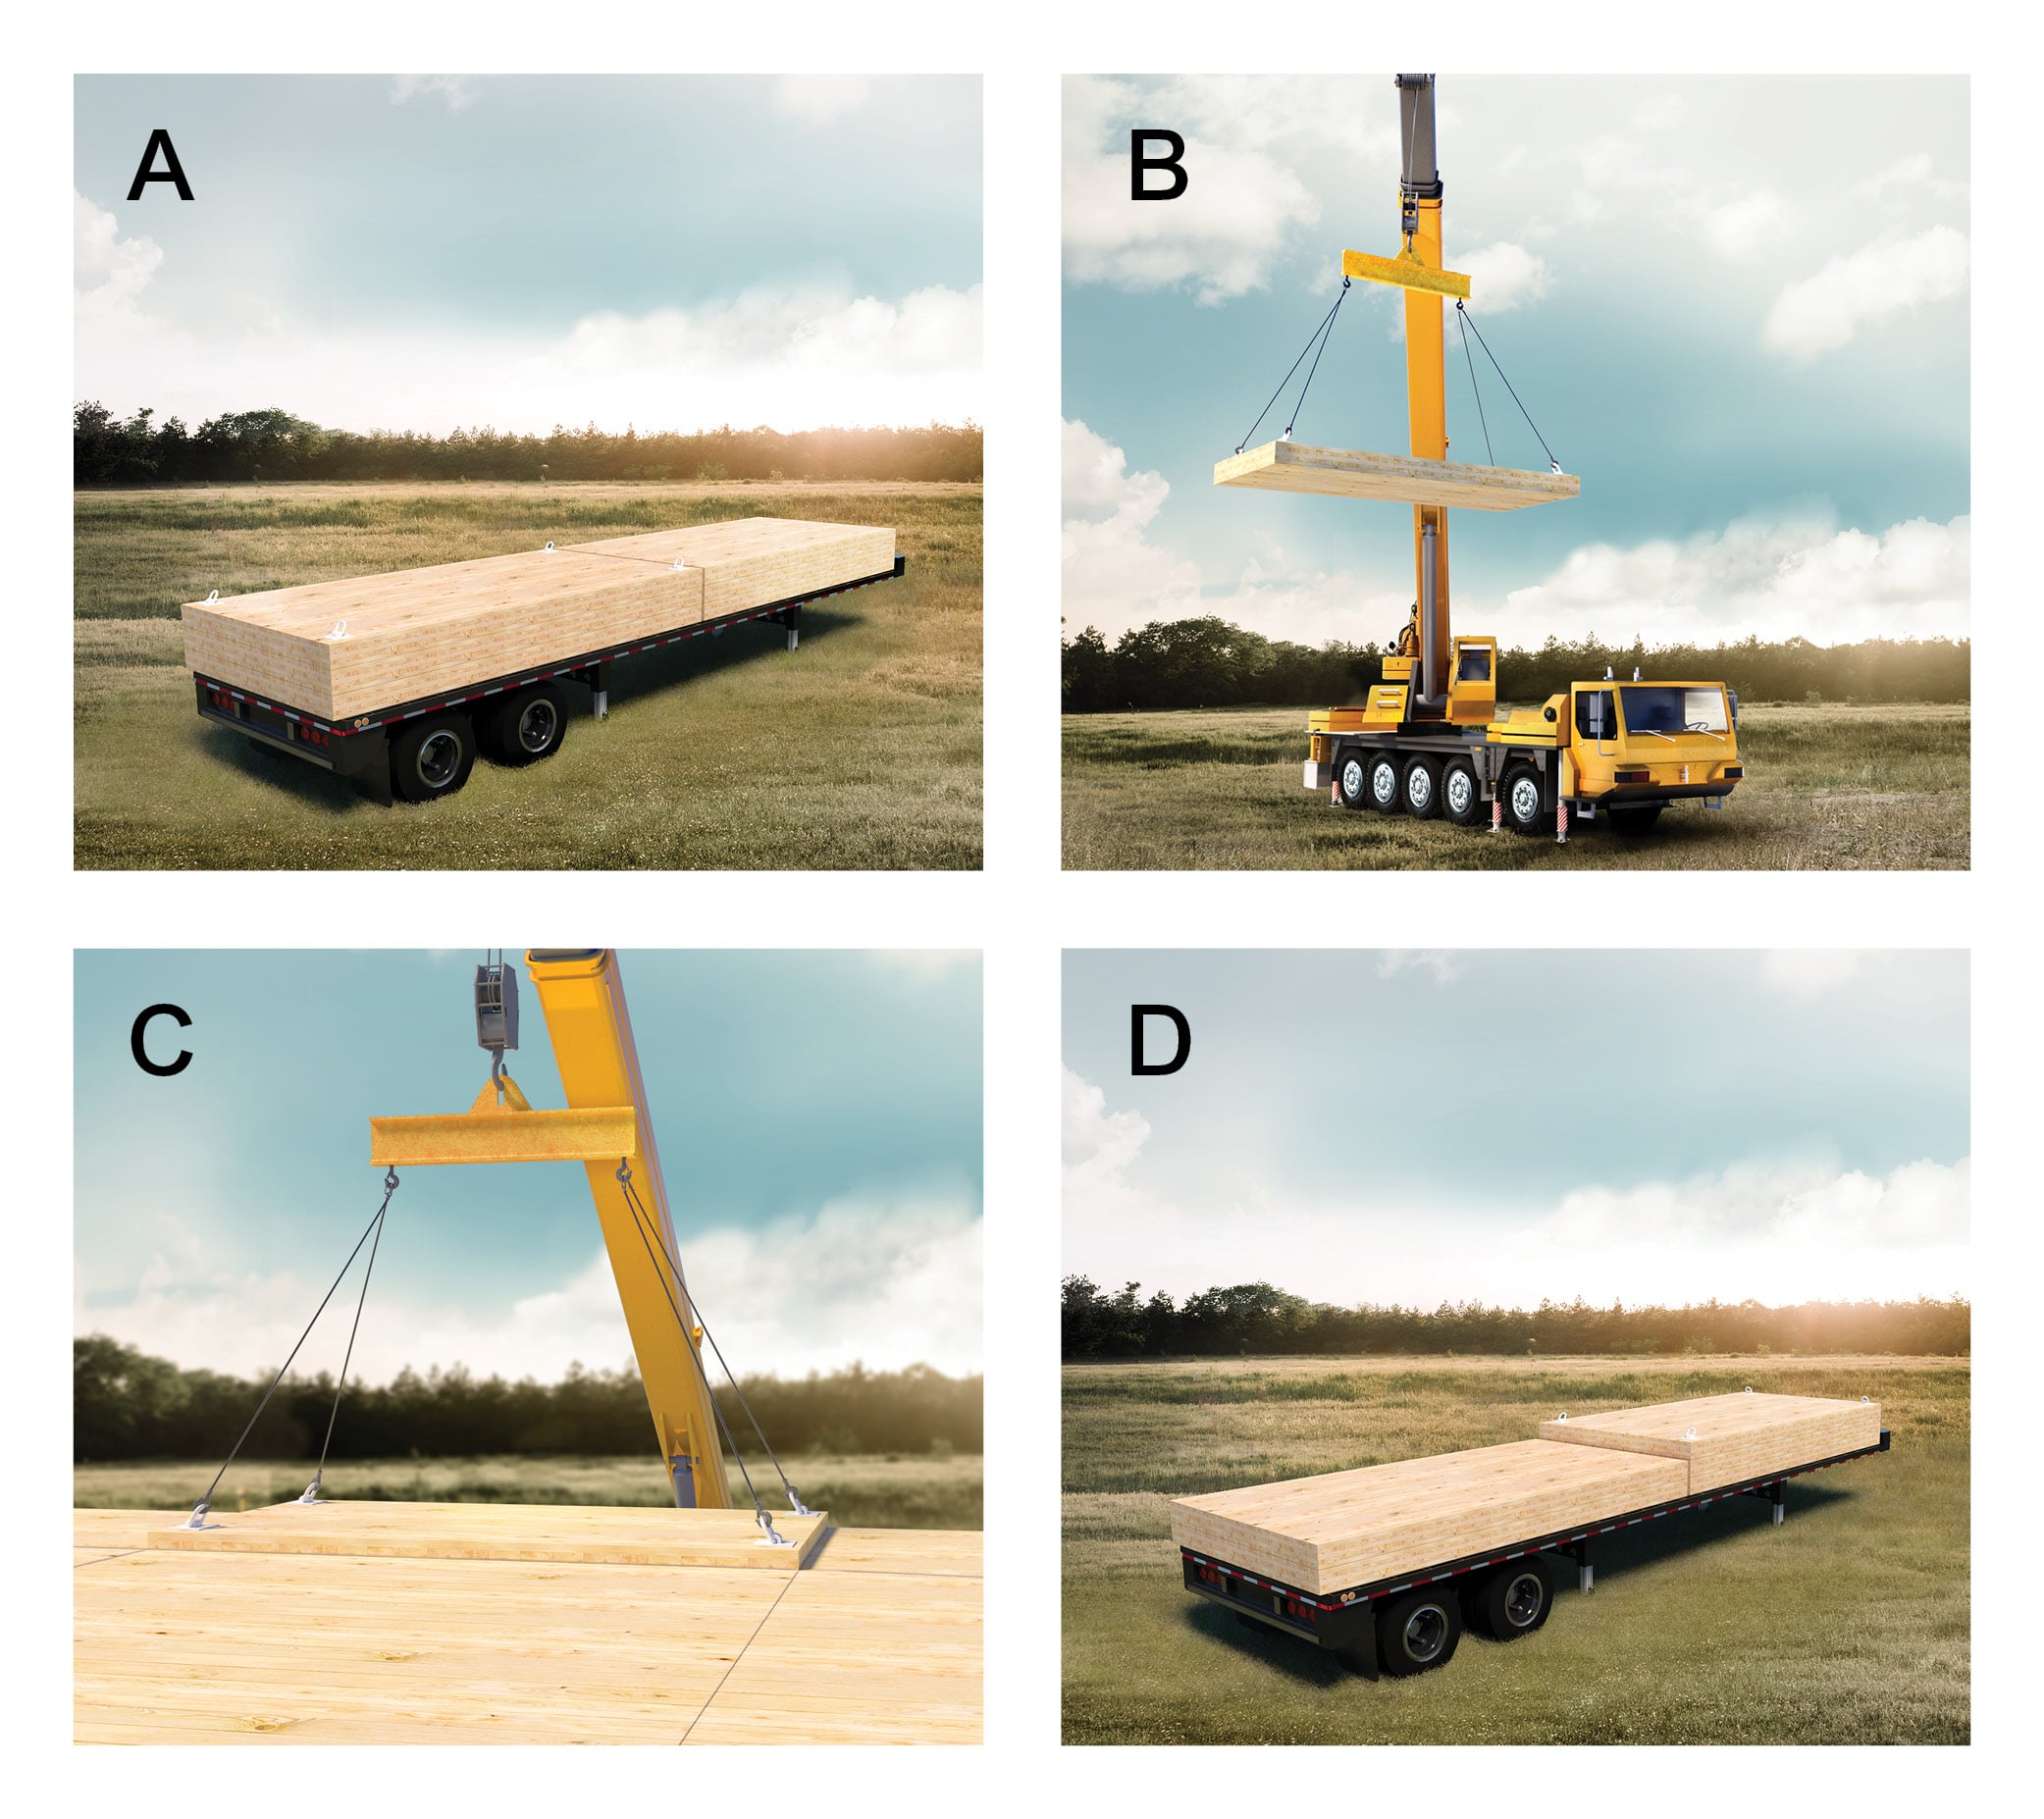
Follow a circular workflow using four sets of rigging hardware, recommended to maximize crane efficiency and reduce delays on-site:
one set is installed on the element on the truck bed (Figure 3A);
one set is used to rig the element into place (Figure 3B);
one set is unmounted from the element in place (Figure 3C); and
one set transported back to the truck (Figure 3D).
Figure 3. Recommended Circular Workflow
After use, store rigging devices designed for mass timber separate from other rigging elements, such as slings and shackles, to prevent use with other materials.
Removal Best Practices
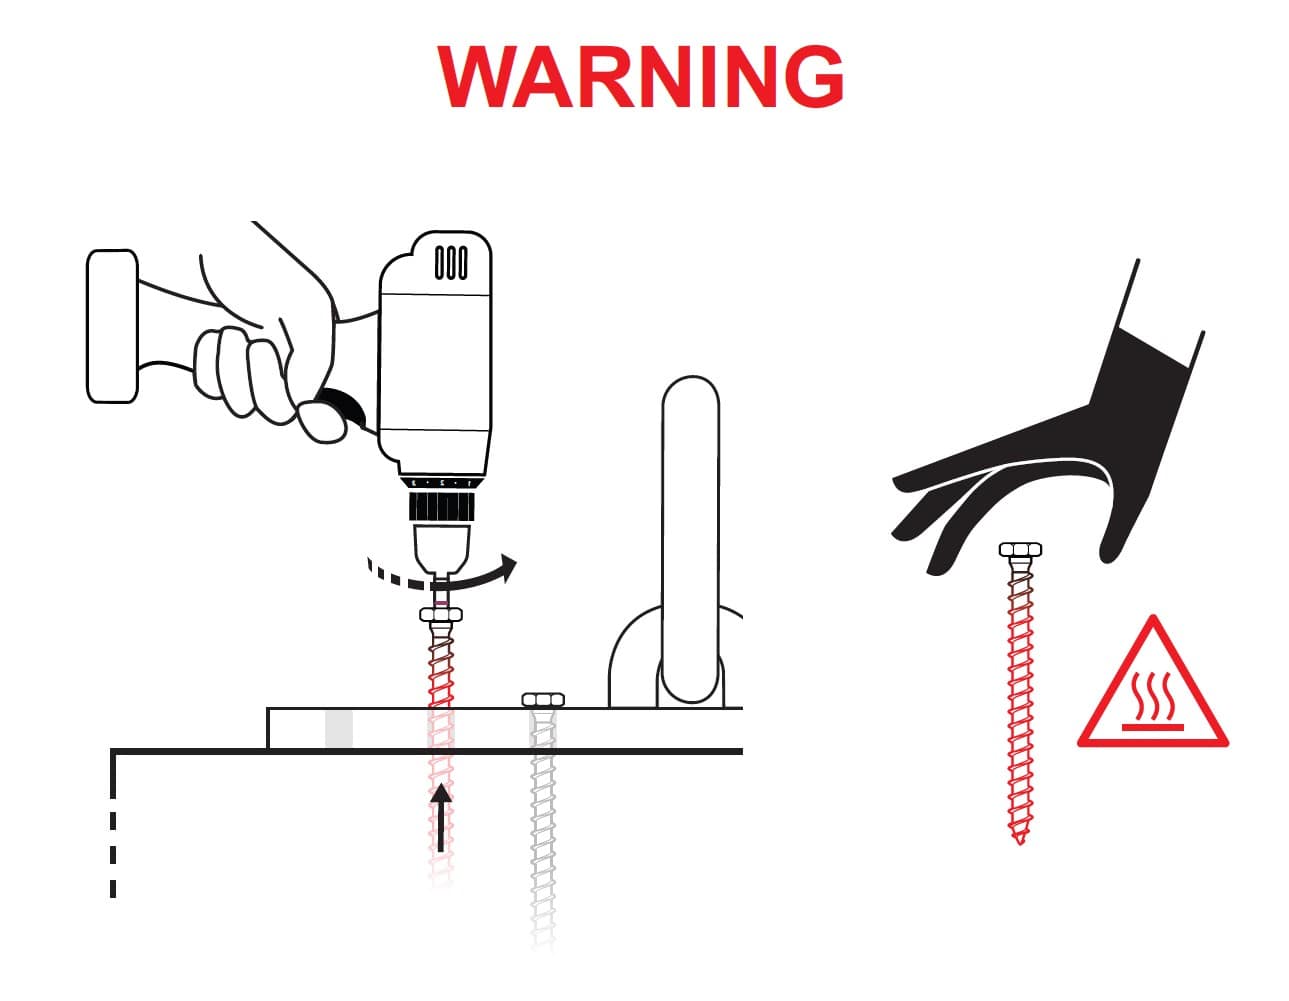
Using the correct drill bit, reverse screws out slowly to avoid breakage after the completion of the lift.
Ensure the drill is aligned along the screw axis, and if possible, set the drill at the lowest speed.
Apply steady, even pressure to maintain drill bit engagement—it is normal to apply more pressure on the fastener during removal than during installation.
Wear heat-resistant gloves as screws will be hot upon removal and can burn bare skin (Figure 4).
Discard the screws used in a rigging device immediately after removal, as they cannot be reused.
Figure 4. Take care when handling hot screws right after removal
In short, use the right tools, follow best practices, engage a licensed rigging professional, and you will make your project a success! Check out our YouTube channel to see how it’s done!
And if you have any questions about our devices or need help with rigging planning, our Technical Support Team is just one click away. 😉